Components
Collection Input
For the cases when it is necessary to add a short list in the form.
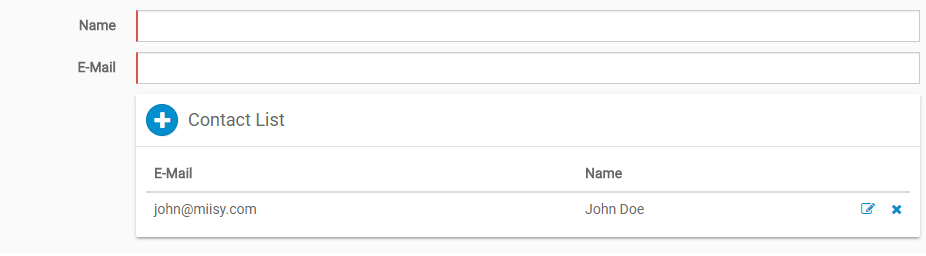
To do this, we need to implement two steps.
First, create a model that represent the form.
public class ContactCommand {
// ------------------------------ FIELDS ------------------------------

    @NotEmpty
    @SimpleLabel("Name")
    private String name;

    @Email
    @NotEmpty
    @SimpleLabel("E-Mail")
    private String email;

// --------------------- GETTER / SETTER METHODS ---------------------

    public String getEmail() {
        return email;
    }

    public void setEmail(String email) {
        this.email = email;
    }

    public String getName() {
        return name;
    }

    public void setName(String name) {
        this.name = name;
    }
}
After that, you just need to inject the component in the form.
new CollectionInput(new ContactCommand())
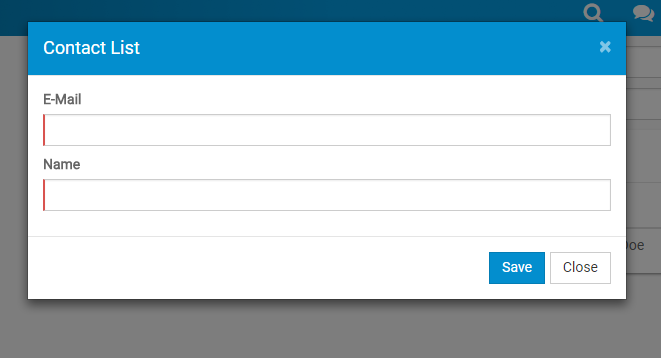
.setTitle("Contact List")
Available Hooks And Optional Form Model
- creation - before opening the creation modal
- create - before create
- edition - before opening the edition modal
- edit - before edit
- exclude - before exclusion
Example:
new CollectionInput(new ContactListCommand(), new ContactCommand())
        .setTitle("Contact List")
        .bindEvent("collectionHooks.creation", "creation.meceap.collectionInput")
        .bindEvent("collectionHooks.create", "create.meceap.collectionInput")
        .bindEvent("collectionHooks.edition", "edition.meceap.collectionInput")
        .bindEvent("collectionHooks.edit", "edit.meceap.collectionInput")
        .bindEvent("collectionHooks.exclude", "exclude.meceap.collectionInput")
@collectionHooks = (->
    creation = (e) ->
        # Hide the contact field on the creation modal
        field.hidden = true for field in e.fields when field.fullName is 'contact'
        true

    create = (e) ->
        # Set manually values before create
        e.item.address = 'Address auto-generated'
        e.item.contact = 'Contact auto-generated'
        true

    edition = (e) ->
        # Set readOnly for all fields
        field.readOnly = true for field in e.fields
        true

    edit = ->
        # Do not allow the edition
        $.MEFloatingError("You cant edit this item.")
        false

    exclude = ->
        # Do not allow the exclusion
        $.MEFloatingError("You cant delete this item.")
        false

    creation: creation
    create: create
    edition: edition
    edit: edit
    exclude: exclude
)()
Wizard
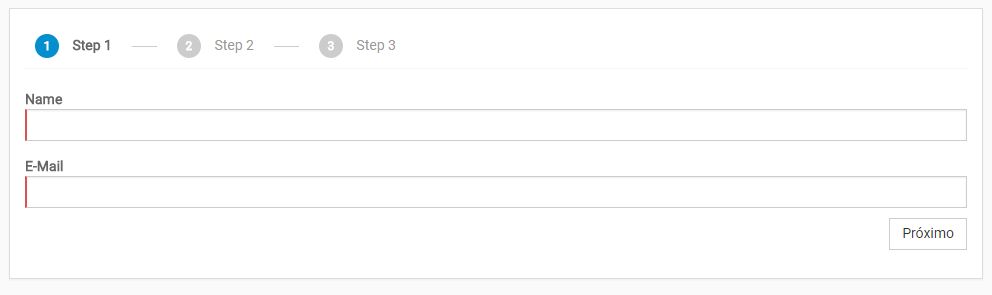
To implement your own wizard you must to use the Wizard html component.
new Wizard()
        .addStep("step1", "Step 1", this.createContent(), "wizard.step")
        .addStep("step2", "Step 2", this.createContent())
        .addStep("step3", "Step 3", this.createContent())
        .setCompleteHandler("wizard.complete")
As you can see, you need to inform which steps will be in your wizard.
To deal with the validation/save we have two client-side handlers.
- StepHandler: Should be used to validate the step.
- CompleteHandler: Should be used to save the model.
@wizard = (->
    step = (params) ->
        $.MEConfirm "Are you sure?", "Confirmation", ->
            params.callback()

    complete = (params) ->
        setTimeout ->
            # saving...
            params.callback?()
        , 3000

    complete: complete
    step: step
)()